Quantcast
Channel: SAP FREE Tutorials
Viewing all 211 articles
Browse latest View live

How to configure SAP Tcode as Custom Tile in Fiori Launchpad

$
0
0

Hello everyone, in this tutorial we will learn how to configure SAP Tcode as Custom Tile in Fiori Launchpad.

In SAP end-to-end implementations and support projects where SAP Fiori is implemented, we mostly get the requirement to configure the standard tcodes/custom tcodes in the Fiori Launchpad as a tile. In SAP we have hundreds of tcodes and not all these converted into Fiori apps, so SAP has given a provision to launch SAP standard tcodes/custom tcodes from Fiori Launchpad. Custom Tile configurations are performed in SAP Fiori Launchpad Designer(FLPD) Lets get started

Prerequisites

  1. You should have access to fiori launchpad designer.
  2. Custom Catalog and Group should exists in the fiori launchpad designer.

Configuration Steps

1. Identify the tcode for which custom tile configurations should take place. For the demo purpose I will choose create sales order tcode – “VA01”

2. Launch fiori launchpad designer by accessing the below URL in the browser.
https://<server>:<port>/sap/bc/ui5_ui5/sap/arsrvc_upb_admn/main.html ?sap-client=<client>&scope = <CONF/CUST>

The launchpad designer is started in CUST mode if the scope parameter is not provided.

3. Choose the catalog from the list of catalogs in the left pane. Next choose the tab Tile. Click on the add new tile.

Transaction code as custom tile in SAP Fiori4. Choose App Launcher – Static tile type from the list of tile template.

5. Provide all necessary values to the fields which are under General and Navigation sections. Click on Save.

Tile transaction code description
Subtitle transaction code
Keywords transaction code (OPTIONAL)
Icon meaningful icon (OPTIONAL)
Information OPTIONAL
Semantic Object provide the custom semantic object created in tcode “/UI2/SEMOBJ”
Eg: SalesOrder
Action choose the process specific action from the list actions available
Eg: create
Parameters sap-ui-tech-hint=TR (OPTIONAL)
Gives the information to the users/developers that it is a tcode

Transaction code as custom tile in SAP Fiori6. A new tile will be created like below.

Transaction code as custom tile in SAP Fiori7. Now click on the tab Target Mappings and click on push button Create Target Mapping.

Transaction code as custom tile in SAP Fiori8. Fill all necessary fields under Intent and Target sections and click on Save.

Semantic Object provide the custom semantic object created in tcode “/UI2/SEMOBJ”
Eg: SalesOrder
Action choose the process specific action from the list actions available
Eg: create

Please note that Semantic Object and Action provided here should be same as the values given in Step-5.

Application Type choose “Transaction” from the drop-down list
Title description
Eg: Create Sales Order
Transaction transaction code – standard/z tcode
Eg: VA01
System Alias provide the system alias configured in the system
Eg: S4SD

9. A new target mapping will be created like below.

10. Now add the newly created tile to the tile group. Choose the group from the left side panel and click on Add New Tile 11. Choose the catalog from the F4 help. All tiles which are in the catalog will be displayed. Click on + sign to add any tile to the group. You will get a success toast message once the tile is added.

12. Launch the Fiori Launchpad, you should be able to see the tile. If you are unable to see check whether catalog, group are added to PFCG role and the role is assigned to the end-user.

Congrats! ? You have successfully configured the SAP Tcode as custom tile in fiori launchpad. Please stay tuned for more SAP Fiori tutorials. Leave a comment in the below comment section and let us know your feedback.

The post How to configure SAP Tcode as Custom Tile in Fiori Launchpad appeared first on SAP Fiori,SAP HANA,SAPUI5,SAP Netweaver Gateway Tutorials,Interview Questions|SAP Learners.


How to create OData service for ABAP CDS Views

$
0
0

Hello everyone in this tutorial we will see on how to create SAP OData service for an ABAP CDS views. Lets get started

We usually create OData services in SAP Gateway system using transaction SAP Gateway Service Builder(SEGW). With introduction of ABAP CDS views in SAP Business Suite 4(S/4 HANA), several thousands of CDS views  are created for efficient and faster data access. A new and easy way of creating OData services based on CDS views was introduced using the annotation @OData.publish: true at view level.

Lets see how we can expose the ABAP CDS View as OData Service using an example and below is the exposure process.

Step-by-Step Procedure

Example #1 – ABAP CDS View with out Parameters

1. Create an ABAP CDS view using ABAP Development Tools in Eclipse. Copy and paste the below code in DDL editor.

@AbapCatalog.sqlViewName: 'ZV_ODATA_DEMO'
@AbapCatalog.compiler.compareFilter: true
@AccessControl.authorizationCheck: #NOT_REQUIRED
@EndUserText.label: 'OData service on ABAP CDS View'


define view ZODATA_DEMO as select from scarr 
{
key carrid      as AirlineCode,
    carrname    as AirlineName,
    currcode    as Currency,
    url         as AirlineURL
}

2. Add the annotation @OData.publish: true  above the DEFINE VIEW statement.

3. After adding the annotation to CDS View save and activate the view.

@AbapCatalog.sqlViewName: 'ZV_ODATA_DEMO'
@AbapCatalog.compiler.compareFilter: true
@AccessControl.authorizationCheck: #NOT_REQUIRED
@EndUserText.label: 'OData service on ABAP CDS View'

@OData.publish: true
define view ZODATA_DEMO as select from scarr 
{
key carrid      as AirlineCode,
    carrname    as AirlineName,
    currcode    as Currency,
    url         as AirlineURL
}

CDS view should meet following rules for successful OData service generation.

  • No syntax errors in DDL source code.
  • At least one key element is defined in the SELECT list of the CDS view.
  • The name of the CDS view should not exceed 26 characters in length.

4. After activating the CDS view, following Gateway artifacts will be generated by the SADL framework in backend server.

  • Technical service name artifact – <cds_view_name>_CDS.
  • Gateway Model artifact with name – <cds_view_name>_CDS.
  • ABAP class with name – CL_<cds_view_name>.

You can find all these artifacts in the transaction code – “/IWBEP/REG_SERVICE”.

5. Launch the transaction code “/IWFND/MAINT_SERVICE” to activate the OData service in hub system. Enter System Alias, Technical Service Name and click the Get Services button. The service will be displayed for selection.

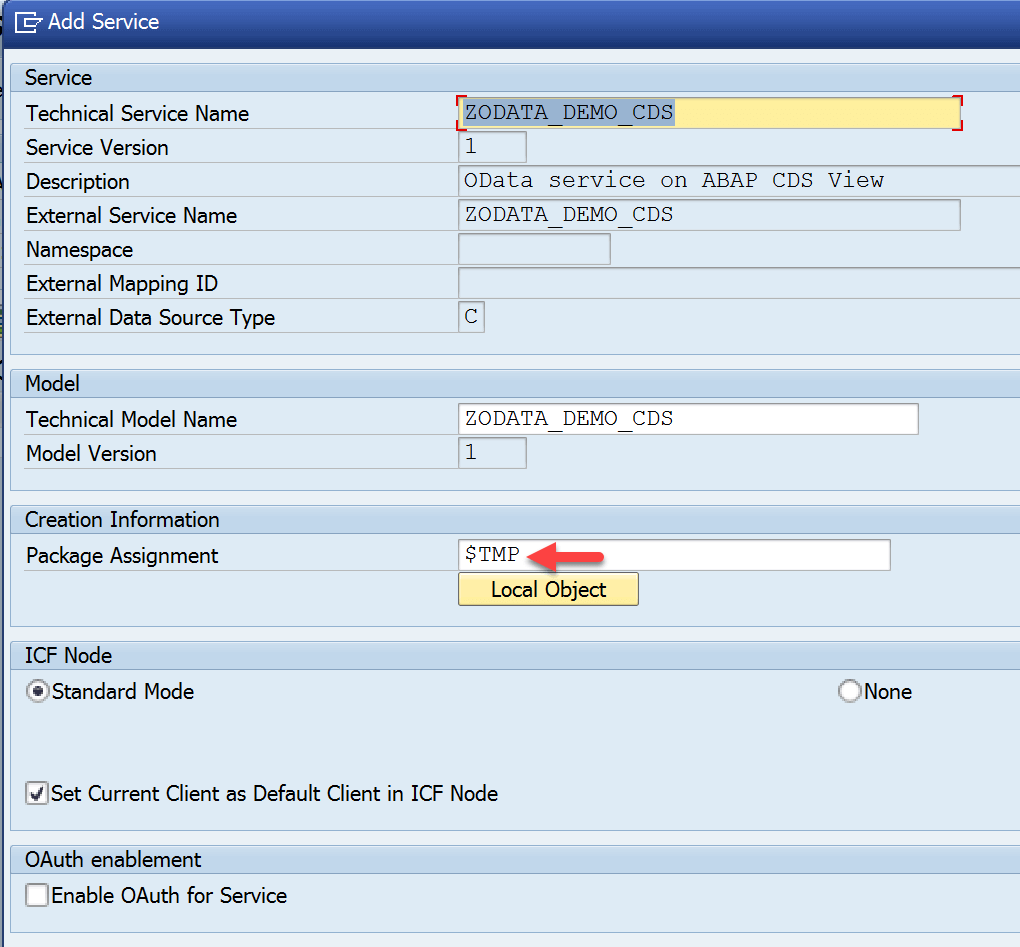
6. In the Add Service dialog box enter the package name. Technical service name and Technical model name will already be suggested. Click on OK to continue.

7. A dialog box appears as shown below, click on OK to continue.

8. As a result OData service is activated successfully in the Gateway hub system. Launch the transaction code “/IWFND/GW_CLIENT” to test the service.

Above is the metadata generated for the OData service created based on the ABAP CDS view. Lets closely look at the metadata and identify the different artifacts as part of the OData service.

  • Entity Type – ZODATA_DEMOType
  • Entity Set – ZODATA_DEMO

Now lets see the data by accessing the entity set
http://<server>:8001/sap/opu/odata/sap/ZODATA_DEMO_CDS/ZODATA_DEMO

Example #2 – ABAP CDS View with Parameters

1. Below is the code for ABAP CDS view with parameters

@AbapCatalog.sqlViewName: 'ZV_ODATA_DEMO_P'
@AbapCatalog.compiler.compareFilter: true
@AccessControl.authorizationCheck: #NOT_REQUIRED
@EndUserText.label: 'OData service on ABAP CDS View'

@OData.publish: true
define view ZODATA_DEMO_PARAMS 
with parameters p_carrid :S_CARR_ID
as select from scarr 

{
key carrid      as AirlineCode,
    carrname    as AirlineName,
    currcode    as Currency,
    url         as AirlineURL
} 
where carrid = $parameters.p_carrid

NOTE: As of now there is no annotation/a way to make the input parameters OPTIONAL in ABAP CDS Views. So you have to pass values for all input parameters in ABAP CDS view while accessing the data from it.

2.  Repeat the steps explained above in the Example #1 to create the OData service for this CDS view also.

3. On successfully OData service generation, execute the OData service and look at the metadata generated and following are the 2 entity sets generated

ZODATA_DEMO_PARAMSSet – Entity set which has 2 key predicates, one is the input parameter and the second one is the key of ABAP CDS View. You need to pass these 2 key predicates while accessing the data

ZODATA_DEMO_PARAMS – Entity set which has 1 key predicate, which is input parameter. You need to pass this key predicate to access the data.

To access the data you can use both entity sets and lets look how we can form the URI for both of them.

If you like to use entity set ZODATA_DEMO_PARAMSSet following the URI to be used /sap/opu/odata/sap/ZODATA_DEMO_PARAMS_CDS/ZODATA_DEMO_PARAMSSet(p_carrid=’AA’,AirlineCode=’AA’)

If you like to use entity set ZODATA_DEMO_PARAMS following the URI to be used   /sap/opu/odata/sap/ZODATA_DEMO_PARAMS_CDS/ZODATA_DEMO_PARAMS(p_carrid=’AA’)/Set

Congrats! ? You have successfully created an OData service for an ABAP CDS view. Please stay tuned for more tutorials. Leave a comment in the below comment section and let us know your feedback.

The post How to create OData service for ABAP CDS Views appeared first on SAP Fiori,SAP HANA,SAPUI5,SAP Netweaver Gateway Tutorials,Interview Questions|SAP Learners.

How to create Associations in ABAP CDS Views

$
0
0

Hello everyone, in this blog post you will learn about Associations in ABAP CDS views and a step by step guide on how to create associations in ABAP CDS views so that you gain knowledge and start implementing them in your projects very easily.

If you are an experienced ABAP developer and have basic knowledge on ABAP CDS view you may jump directly to the step-by-step guide.For beginners you may have to start with prerequisites section and come back to this blog post to further gain knowledge on ABAP CDS views. Lets get started

Prerequisites

Step-by-step Procedure

Before starting our development lets understand about the background of associations and its usability.

What is an Association ?

Association is a relationship between two CDS views.

We will understand this definition by looking at an example. Lets say we have 2 CDS views, one CDS View-1 which will retrieve the order header information and two CDS View-2 which will retrieve the order line item information. By establishing the relationship between these 2 CDS views on a command field/expression to get the order header and its line item information is defined as association. Lets start our development to understand even better

  1. Create a CDS View to get the sales order header information from the database table(VBAK). Below is the sample DDL code snippet for the same.
@AbapCatalog.sqlViewName: 'ZV_ORD_HDR'
@AbapCatalog.compiler.compareFilter: true
@AccessControl.authorizationCheck: #NOT_REQUIRED
@EndUserText.label: 'Order Header Information'
define view ZCDS_SALESORDER_HDR 
as select from vbak 
{
  vbeln, 
  erdat,
  vbtyp,
  auart,
  vkorg,
  vtweg,
  spart,
  netwr,
  waerk   
}

2. Create another CDS view to get the sales order item information from the database table(VBAP). Below is the sample DDL code snippet for the same.

@AbapCatalog.sqlViewName: 'ZV_ORD_ITM'
@AbapCatalog.compiler.compareFilter: true
@AccessControl.authorizationCheck: #NOT_REQUIRED
@EndUserText.label: 'Order Item Information'
define view ZCDS_SALESORDER_ITM 
as select from vbap 
{
 vbeln,
 posnr,
 matnr,
 zwert,
 zmeng  
}

the above cds view seems to simple select from single table, lets make it complex by adding JOINS to get more details.

@AbapCatalog.sqlViewName: 'ZV_ORD_ITM'
@AbapCatalog.compiler.compareFilter: true
@AccessControl.authorizationCheck: #NOT_REQUIRED
@EndUserText.label: 'Order Item Information'
define view ZCDS_SALESORDER_ITM 
as select from vbap
left outer join makt on vbap.matnr = makt.matnr 
{
 vbeln,
 posnr,
 vbap.matnr,
 makt.maktx,
 zwert,
 zmeng  
}
#Association on ABAP CDS Views

Now lets create an associations between these two CDS views. below is the syntax for creating associations.

@AbapCatalog.sqlViewName: 'ZV_ORD_HDR'
@AbapCatalog.compiler.compareFilter: true
@AccessControl.authorizationCheck: #NOT_REQUIRED
@EndUserText.label: 'Order Header Information'
define view ZCDS_SALESORDER_HDR 
as select from vbak
   association to ZCDS_SALESORDER_ITM as _OrderItems
               on vbak.vbeln = _OrderItems.vbeln  
{
  key vbeln, 
  erdat,
  vbtyp,
  auart,
  vkorg,
  vtweg,
  spart,
  netwr,
  waerk,
  _OrderItems.matnr,
  _OrderItems.maktx   
}

Line 7-8 : association syntax on another CDS view ZCDS_SALESORDER_ITM based on the VBELN(sales order number) field.

Line 19-20 : fields from the association can be accessed in the SELECT list by prefixing them with association name followed by period( . ) _OrderItems.matnr

#Association with cardinality

Now lets try to add the cardinality on the target cds view which is defined with association with this syntax [min..max]

@AbapCatalog.sqlViewName: 'ZV_ORD_HDR'
@AbapCatalog.compiler.compareFilter: true
@AccessControl.authorizationCheck: #NOT_REQUIRED
@EndUserText.label: 'Order Header Information'
define view ZCDS_SALESORDER_HDR 
as select from vbak
   association [1..*] to ZCDS_SALESORDER_ITM as _OrderItems
               on vbak.vbeln = _OrderItems.vbeln  
{
  key vbeln, 
  erdat,
  vbtyp,
  auart,
  vkorg,
  vtweg,
  spart,
  netwr,
  waerk,
  _OrderItems.matnr,
  _OrderItems.maktx   
}

Below are the rules for min and max values.

  • max cannot be 0.
  • An asterisk * for max means any number of rows.
  • min can be omitted (set to 0 if omitted).
  • min cannot be *.
  • When an association is used in a WHERE condition, 1 must be specified for max.
#Association ON condition rules

When specifying the ON condition with association, following rules are applied.

  • The fields specified in the ON condition should be included in the SELECT list. In our example, the field VBELN is specified in ON condition and SELECT list.
  • The fields of source data source can be prefixed with $projection instead of data source name.
    define view ZCDS_SALESORDER_HDR 
    as select from vbak
       association [1..*] to ZCDS_SALESORDER_ITM as _OrderItems
                   on $projection.vbeln = _OrderItems.vbeln  
    { ..... }
  • the fields of target data source should be prefixed with association name. _OrderItems.vbeln
Data Preview

Right click on the DDL editor

Output data of the ABAP cds view will be displayed like below

Choose any one record and right click on it and choose Follow Association

List of associations will be displayed in a window like below, choose the relevant association

Double click on the association to see the data

# Association as join type

The association defined in an ABAP CDS view will be converted to join type at run-time. By default the join type is LEFT OUTER JOIN.

The below CDS view will result in LEFT OUTER JOIN when executed.

@AbapCatalog.sqlViewName: 'ZV_ORD_HDR'
@AbapCatalog.compiler.compareFilter: true
@AccessControl.authorizationCheck: #NOT_REQUIRED
@EndUserText.label: 'Order Header Information'
define view ZCDS_SALESORDER_HDR 
as select from vbak
   association [1..*] to ZCDS_SALESORDER_ITM as _OrderItems
               on $projection.vbeln = _OrderItems.vbeln  
{
  key vbeln, 
      erdat,
      vbtyp,
      auart,
      netwr,
      waerk,
  
     _OrderItems.matnr
}

To achieve INNER JOIN, you need to define the attribute in the path expression like below.

@AbapCatalog.sqlViewName: 'ZV_ORD_HDR'
@AbapCatalog.compiler.compareFilter: true
@AccessControl.authorizationCheck: #NOT_REQUIRED
@EndUserText.label: 'Order Header Information'
define view ZCDS_SALESORDER_HDR 
as select from vbak
   association [1..*] to ZCDS_SALESORDER_ITM as _OrderItems
               on $projection.vbeln = _OrderItems.vbeln  
{
  key vbeln, 
      erdat,
      vbtyp,
      auart,
      netwr,
      waerk,
  
     _OrderItems[inner].matnr
}
Usage of CDS view with association in ABAP using OpenSQL

We can access the cds view which has associations defined in ABAP program using Open SQL statement using the path expressions like below

DATA(is_supported) = cl_abap_dbfeatures=>use_features(
                    requested_features = VALUE #( ( cl_abap_dbfeatures=>views_with_parameters ) ) ).

IF is_supported IS NOT INITIAL.
  SELECT  *
    FROM zcds_salesorder_hdr
    INTO TABLE @DATA(lt_data).
ENDIF.
DATA(is_supported) = cl_abap_dbfeatures=>use_features(
                    requested_features = VALUE #( ( cl_abap_dbfeatures=>views_with_parameters ) ) ).
IF is_supported IS NOT INITIAL.
  SELECT  vbeln,
      erdat,
    \_orderitems-matnr AS material
    FROM zcds_salesorder_hdr
    INTO TABLE @DATA(lt_data).
ENDIF.


Congrats.! You have successfully learned on how to create associations in ABAP CDS views.Please stay tuned to us for more ABAP CDS view tutorials.


The post How to create Associations in ABAP CDS Views appeared first on SAP Fiori,SAP HANA,SAPUI5,SAP Netweaver Gateway Tutorials,Interview Questions|SAP Learners.

How to create OData service for ABAP CDS views in SEGW

$
0
0

Hello everyone, in this blog we will discuss on how to create OData service for ABAP CDS views in SEGW transaction.

In previous blog How to create OData service for ABAP CDS Views we have seen an easy approach on exposing the ABAP CDS view as an OData service using the annotation @OData.publish: true and also the restrictions/disadvantages by following the approach.

To overcome the above restriction, we can follow this approach. Below are the features supported.

Advantages and Features Supported

  • Multiple Entities
  • Associations
  • Actions using Function Imports in SEGW
  • CDS View with parameters
  • CDS annotations considered and derived at runtime
  • CDS changes will be reflected at runtime, no need for re-activation

Prerequisites

Basic understating of ABAP CDS views, to know more click here.

Step-by-Step Procedure

Creating an New Project
  1. Launch SEGW – Gateway Service Builder transaction on front-end server(FES).
  2. Click on Create Project and provide the necessary details on Create Project dialog box.
  3. A new SEGW project will be created with empty data model like below.
Reference Data Source
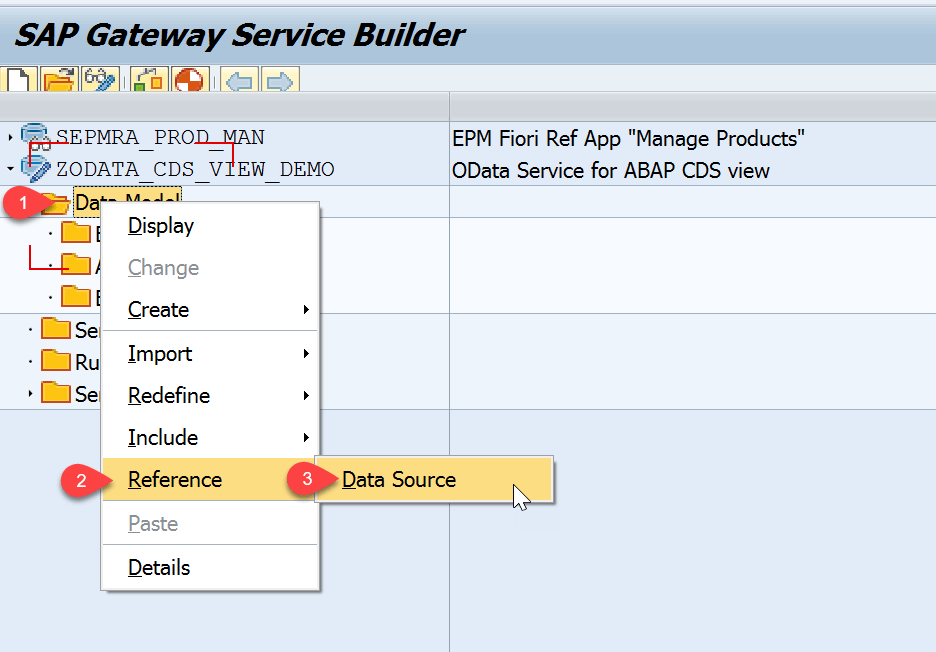
  1. Now right-click on the Data Model choose Reference and then Data Source.
  2. A new Reference Data Source wizard will open like below. Choose ABAP CDS view using the F4 help and hit Next.
  3. In the next wizard step check the information and hit Finish.
  4. ABAP CDS entity will be successfully referenced in the SEGW project and new folder Data Source References will be created under Data Model folder.
  5. Entity types, Entity Sets and Associations will automatically created for the ABAP CDS view.
  6. You can further explore the properties and other artifacts created.
Generating Model Provider Class/Data Provider Class and Other Runtime Objects
  1. Navigate and select the project node and hit Generate Runtime Objects button to generate the SEGW OData service run-time artifacts.
  2. On Model and Service Definition dialog box, a list of classes is shown and will be generated. You can go with default name or change them if you like to give different names and hit OK
  3. On the Create Object Directory Entry dialog box, enter a value (e.g. $TMP) to the Package field, and then choose Save.
  4. Now the service classes are generated.
Activating Service
  1. Launch the transaction /IWFND/MAINT_SERVICE – Activate and Maintain Services.
  2. Choose Add Service.
  3. On Add Selected Service screen provide the value for System Alias field and then choose Enter. A list of services is then displayed.
  4. From the list of services choose the relevant service, you can search based on your project name. Click on Add Selected Services
  5. On Add Service dialog box specify the package name and choose Enter.
  6. Service is successfully activated with message dialog box like below.
  7. Go back to the Activate and Maintain Services screen and filter with service we just created above. Choose SAP Gateway Client.
Test Service in Gateway Client
  1. On SAP Gateway Client, choose Execute to view the metadata of the OData service.
  2. Navigate to EntitySets button from the application toolbar and choose the entity set.
  3. Choose Execute to view the data retrieved from the ABAP CDS view.

Congrats..! You have successfully created an OData service for ABAP CDS view using SEGW based on SADL framework.

The post How to create OData service for ABAP CDS views in SEGW appeared first on SAP Fiori,SAP HANA,SAPUI5,SAP Netweaver Gateway Tutorials,Interview Questions|SAP Learners.

How to create OData Service for ABAP CDS View using Mapping Editor in SEGW

$
0
0

Hello everyone, in this blog post we will learn how to create an OData Service for ABAP CDS Views using Mapping Editor in SEGW(Gateway Builder).

There are 3 different ways to implement an OData service for an ABAP CDS view. Till now we have learnt 2 different approaches, in this blog we will learn the last approach using Mapping Editor in SEGW Gateway Builder. Please find the links below for the first 2 approaches.

Lets start the process by creating an ABAP CDS view in Eclipse ADT(ABAP Development Tools). Copy and paste the below DDL source code in the CDS view editor.

@AbapCatalog.sqlViewName: 'ZV_ODATA_DEMO'
@AbapCatalog.compiler.compareFilter: true
@AccessControl.authorizationCheck: #NOT_REQUIRED
@EndUserText.label: 'OData service on ABAP CDS View'

@OData.publish: true
define view ZODATA_DEMO as select from scarr 
{
key carrid      as AirlineCode,
    carrname    as AirlineName,
    currcode    as Currency,
    url         as AirlineURL
}

Save and activate the CDS view.

Step-by-Step Procedure

1. Creating a New Project

1.1  Launch SEGW – Gateway Service Builder transaction on front-end server(FES).

1.2  Click on Create Project and provide the necessary details on Create Project dialog box.

1.3  A new SEGW project will be created with empty data model like below.

1.4  Right click on the Entity Types node which is under Data Model to create a new entity type.

1.5  On Create Entity Type dialog box, provide the Entity Type Name, tick Create Relate Entity Set check box to system proposed Entity Set Name. Hit OK button.
Note: To create an entity type you can directly import the DDIC Structure by right clicking on Data Model node → Import → DDIC Structure.

1.6  After creating entity type and its corresponding entity set, now the project will look like this.2. Mapping Editor

In this step we will map the ABAP CDS view data source to the entity set to retrieve the data

2.1  Expand Service Implementation node → Select and Right click on the entity set name to which you need to map the data source and choose Map to Data Source from the context menu.

2.2  On Map to Data Source dialog box, for Type field choose “Business Entity” and select value-help for Name field.

2.3  On Select Business Entity dialog box, chose the ABAP CDS view name and hit OK button.

2.4  On Mapping Editor screen, hit the button Generate Mapping to automatically map the fields. Instead you can also map the individual fields by drag and drop the fields.

3. Generating Model Provider Class/Data Provider Class and Other Runtime Objects

3.1  Navigate and select the project node and hit Generate Runtime Objects button to generate the SEGW OData service run-time artifacts.

3.2  On Model and Service Definition dialog box, a list of classes is shown and will be generated. You can go with default name or change them if you like to give different names and hit OK.

3.3  On the Create Object Directory Entry dialog box, enter a value (e.g. $TMP) to the Package field, and then choose Save.

3.4  Now the gateway service classes are generated successfully.

4. Activating Service

4.1  Launch the transaction /IWFND/MAINT_SERVICE – Activate and Maintain Services.

4.2  Choose Add Service.

4.3  On Add Selected Service screen provide the value for System Alias field and then choose Enter. A list of services is then displayed.

4.4  From the list of services choose the relevant service, you can search based on your project name. Click on Add Selected Services

4.5  On Add Service dialog box specify the package name and choose Enter.

4.6  Service is successfully activated with message dialog box like below.

4.7  Go back to the Activate and Maintain Services screen and filter with service we just created above. Choose SAP Gateway Client.

5. Test Service in Gateway Client

5.1  On SAP Gateway Client, choose Execute to view the metadata of the OData service.

5.2  Navigate to EntitySets button from the application toolbar and choose the entity set.

5.3  Choose Execute to view the data retrieved from the ABAP CDS view.

Congrats..! You have successfully created an OData service for ABAP CDS view using SEGW based on SADL framework. Please stay tuned for ABAP CDS View Tutorials.

ABAP CDS View

Leave a comment in the below comment section and let us know your feedback.

The post How to create OData Service for ABAP CDS View using Mapping Editor in SEGW appeared first on SAP Fiori,SAP HANA,SAPUI5,SAP Netweaver Gateway Tutorials,Interview Questions|SAP Learners.
How to map message to OData response header SAP-Message

$
0
0

Hello everyone, in this blog post you will learn how to to map message to OData response header SAP-Message.

Message Container

Message Container in backend OData service is used to add the success or error messages to the response of the OData call from UI, so that UI can retrieve these message and show them to the user. UI here could be custom SAPUI5/SAP Fiori application or any 3rd party UI frameworks as well.

In the backend system a standard interface /IWBEP/IF_MESSAGE_CONTAINER is available to add the messages to the OData response.

HTTP Response header parameter “sap-message”

When a request called from SAPUI5/SAP Fiori application is successful and the success, warning messages needs to be send back to the consumer, we can use the response parameter “sap-message” to send the messages. Message container interface /IWBEP/IF_MESSAGE_CONTAINER is used to map message container to this message protocol.

Lets start by creating an example to map the messages in the OData service and how SAPUI5/SAP Fiori application can retrieve these message to display on UI.

Step-by-Step Procedure

#1 Create an OData service

Create a OData service in backend system/front system with an entity set called “AirlineSet” which retrieves the different airlines available in the table. Here I took this simple example to demonstrate the concept, you may choose a different example as per your need.

We have step-by-step guides available here to explain the process of OData creation, I will not explain the process as we are focusing on this particular concept.

Please continue further after you have an entity set ready and code exists in the Data Provider Class(DPC) extension to get the data. You code may look like below

METHOD airlineset_get_entityset.

  SELECT * FROM scarr INTO CORRESPONDING FIELDS OF TABLE et_entityset.

ENDMETHOD.
 #2 Test the OData Service

Test the OData service in the gateway client, you should see a success response like below with HTTP response code as 200.

Now our next step to step is add the some success, warning message to this response. Lets say a sample message about airline discounts. So modify the above code to add the message.

#3 Adding a message to HTTP response header parameter “sap-message”
Instantiate the Message Container

Method GET_MESSAGE_CONTAINER is found in the DPC extension class to instantiate the message container. Sample ABAP code is available below

  METHOD airlineset_get_entityset.

    SELECT * FROM scarr INTO CORRESPONDING FIELDS OF TABLE et_entityset.

*1. Instatiate the Message Container
    DATA: lo_message_container TYPE REF TO /iwbep/if_message_container.

    CALL METHOD me->/iwbep/if_mgw_conv_srv_runtime~get_message_container
      RECEIVING
        ro_message_container = lo_message_container.

  ENDMETHOD.
 Add the message to the Message Container

To add a message to the message container, we can use any of these methods in the message container interface, in the example we use the basic method ADD_MESSAGE

  • ADD_MESSAGE_FROM_EXCEPTION
  • ADD_MESSAGES_FROM_BAPI
  • ADD_MESSAGE_FROM_BAPI
  • ADD_MESSAGE
  • ADD_MESSAGE_TEXT_ONLY

Method ADD_MESSAGE required message class, id and type of the message.

METHOD airlineset_get_entityset.

    SELECT * FROM scarr INTO CORRESPONDING FIELDS OF TABLE et_entityset.

*1. Instatiate the Message Container
    DATA: lo_message_container TYPE REF TO /iwbep/if_message_container.

    CALL METHOD me->/iwbep/if_mgw_conv_srv_runtime~get_message_container
      RECEIVING
        ro_message_container = lo_message_container.

    CALL METHOD lo_message_container->add_message
      EXPORTING
        iv_msg_type               = /iwbep/cl_cos_logger=>warning
        iv_msg_id                 = 'ZTEST'
        iv_msg_number             = '000'
        iv_add_to_response_header = abap_true. "add the message to the header

  ENDMETHOD.

The important parameter which should be noted here is IV_ADD_TO_RESPONSE_HEADER,if we set this parameter as true then the message will be added to the response header parameter “sap-message”.

Now test the service again in the gateway client to validate whether the message exists in the response header.

In the above OData response, the message appears in the header parameter “sap-message”.

We have successfully map the message container to the response header parameter “sap-message”.

Display the message in SAPUI5 / SAP Fiori application

To display the message in SAPUI5 and SAP Fiori applications, we need to read the response object and read the message. Below sample JS code snippet can be used to read the header message.

Below is the code of a view controller, in this example we log the message to the console. You may have alternative way to display the messages in dialog

sap.ui.define([
  "sap/ui/core/mvc/Controller"
], function(Controller) {
  "use strict";

  return Controller.extend("com.saplearners.controller.View1", {
    onInit: function() {

      var oModel = new sap.ui.model.json.JSONModel();
      this.getView().setModel(oModel, "viewData");

      var oServiceModel = new sap.ui.model.odata.v2.ODataModel("/sap/opu/odata/sap/ZMSG_CONT_DEMO_SRV/");
      var mParameters = {
        method: "GET",
        success: jQuery.proxy(function(oData, response) {
          this.getView().getModel("viewData").setProperty("/AirlineSet", oData.results);

          // response header
          var hdrMessage = response.headers["sap-message"];
          var hdrMessageObject = JSON.parse(hdrMessage);

          // log the header message
          console.log(hdrMessageObject);
          console.log(hdrMessageObject.message);
        }, this),

        error: jQuery.proxy(function(oError) {

        }, this)
      };

      oServiceModel.read("/AirlineSet", mParameters);
    }

  });
});
 Console

Congrats..! We have successfully learned how to map message to OData response header SAP-Message. Please stay tuned for more SAP Gateway tutorials.

The post How to map message to OData response header SAP-Message appeared first on SAP Fiori,SAP HANA,SAPUI5,SAP Netweaver Gateway Tutorials,Interview Questions|SAP Learners.

How to create custom theme using SAP Fiori UI Theme Designer

$
0
0

Hello everyone, in the blog post we will learn how to create custom theme in SAP Fiori UI Theme Designer.

Before going further, if you would like to know basics of UI Theme Designer you can check these blogs.

Custom theme

Custom theme is a new theme created based on SAP standard theme which includes visual appearance changes needed by customer.

SAP standard theme + your branding changes = custom theme

Customers who adapts SAP Fiori Launchpad as their business user interface would like to adapt the visual appearance to their corporate branding. UI Theme Designer can be used to meet their theming and branding needs.

Lets see how we can create a custom theme using UI Theme Designer.

Step-by-Step Procedure

1. Launch the UI Theme Designer with the transaction code – /UI5/THEME_DESIGNER

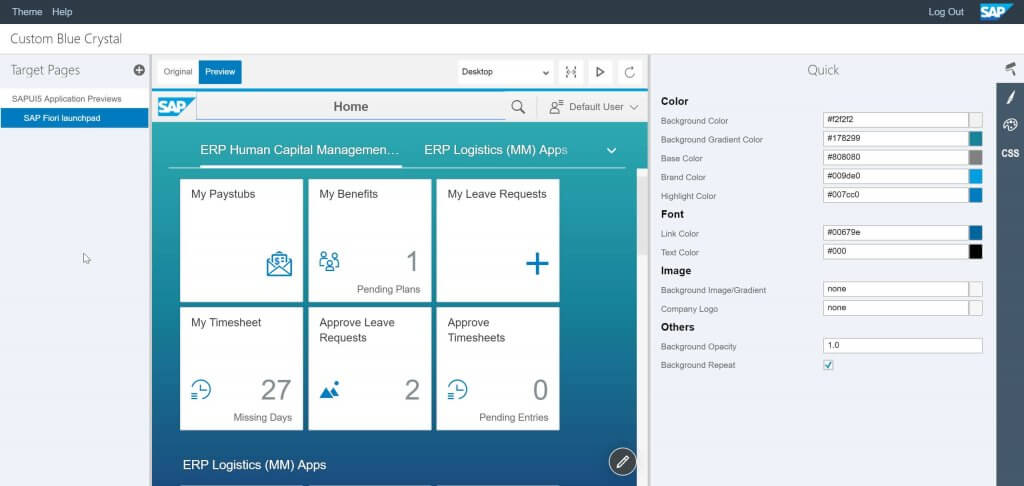
2. Below screen will be launched in a browser window with all available themes in the system.3. To create a new theme, choose any one of the standard theme and hit Open.

4. Click on Add Target Page to add the target pages for theming.

5. Choose SAPUI5 Application Previews from the list of Test Suites available.

6. A new screen will be displayed like below, then select SAP Fiori Launchpad. After selection, it will be added to Target Pages section like below.

7. Now select the SAP Fiori Launchpad which is under the Target Pages section. SAP Fiori Launchpad preview will be seen like below.

8. In Theming and Parameters Area, choose Quick theming

9. Now we are going to change the quick theming parameters Brand Color, Background Gradient Color, this will change the background color of the SAP Fiori Launchpad.

Choose different colors for these parameters using color palette available beside to the input. Sample example like below

10. You can also apply background image and change the company logo like below

11. To save the custom theme, navigate to Theme → Save & Build.

12. On Save & Build dialog box, provide Theme ID and Title and hit Save & Build.

13. Custom theme build process will begin


Congrats.! ? you have successfully created a custome theme using UI Theme Designer. In our next tutorial you will learn how to add the custom theme to the SAP Fiori Launchpad. Please stay tuned for more SAP Fiori Tutorials and feel free to let us know comments and feedback.

The post How to create custom theme using SAP Fiori UI Theme Designer appeared first on SAP Fiori,SAP HANA,SAPUI5,SAP Netweaver Gateway Tutorials,Interview Questions|SAP Learners.

How to use custom icons in SAPUI5

$
0
0

Hello every one, in this tutorial we will learn

How to use custom icons in SAPUI5 applications

Background

In my project we got a requirement to use icons which are not available in SAPUI5 standard icon explorer.

SAPUI5 icon explorer have 637 icons which is quite good number with various categories and groups. After spending quite good amount of time in going through the icons we could not able to find the perfect match.

So we decided to use icons from the FontAwesome and our client has also purchased the Pro version of it.

I will try to explain the steps to use custom icons in SAPUI5 applications here. Lets get started.

Step-by-Step Procedure

1. Open FontAwesome icon explorer in browser window and explore through the icons and examples provided in their website.

2. Download The Iconic Font and CSS toolkit by clicking on the download button available on the home page.

3. After successful download extract the file, the extracted folder will look like below. We need the files which are under css and fonts folder.4. Create a sample SAPUI5 application in SAP Web IDE.

5. Right click on css folder to import the FontAwesome css files into our SAPUI5 application.

6. Choose minified version of FontAwesome css file “font-awesome.min.css” and import the file into css folder.

7. Right click on webapp folder to create a new folder and name it as “fonts“.

8. Add all the font files to the fonts folder from FontAwesome extracted folder in Step-3. Now the project structure will be like below.

9. We have successfully added all necessary files to our SAPUI5 application and our next step is to use these icons in the View.

10. Navigate to the XML view and add an Icon UI control to the view and add relevant FontAwesome css class to the UI control like below.

<mvc:View controllerName="com.fontawesome.FontAwesomDemo.controller.View1" xmlns:html="http://www.w3.org/1999/xhtml"
  xmlns:mvc="sap.ui.core.mvc" displayBlock="true" xmlns="sap.m" xmlns:core="sap.ui.core">
  <App>
    <pages>
      <Page title="Font Awesome Medical Icons">
        <content>
          <VBox>
          <!--Add FontAwesome icon class to the Label-->
          <Label class="fa fa-ambulance fa-4x"></Label>
          
          <!--Add FontAwesome icon class to the Text-->
          <Text class="fa fa-ambulance fa-4x"></Text>
          
          <!--Add FontAwesome icon class to the Icon-->
          <core:Icon class="fa fa-ambulance fa-4x"></core:Icon>
          
          </VBox>
        </content>
      </Page>
    </pages>
  </App>
</mvc:View>

11. Save the view and run the application, you should be able to see the below output.

Conclusion

Explore different icons from the FontAwesome and try implementing them in your projects. Let me know your comments and feedback in the comments section below.

Please stay tuned to us for more SAPUI5 Tutorials.

The post How to use custom icons in SAPUI5 appeared first on SAP Fiori,SAP HANA,SAPUI5,SAP Netweaver Gateway Tutorials,Interview Questions|SAP Learners.


S4HANA – How to enable SAP Easy Access Menu for Fiori Launchpad

$
0
0

Hello everyone, in this blog post i would like to share step-by-step guide on how to enable SAP Easy Access Menu for Fiori Launchpad in S4HANA

How to enable SAP Easy Access Menu for Fiori Launchpad in S/4 HANA

Background

In my recent project assignment i was asked to enable SAP Easy Access Menu for Fiori Launchpad. At first i was not sure about the approach, after spending some time on internet and going through SAP best practice guides i am able to show the SAP Easy Access Menu (or) SMEN transaction with some hick-ups during the implementation.

Other Terms

Step-by-Step Procedure

1. Log On to SAP Gateway system if the Fiori deployment is Hub, in case of embedded deployment logon to the system in which SAP_UI component is installed (..in my case it is Hub deployment S4HANA system as backend system and SAP Gateway as Front End Server).

2. Launch Activate and Maintain Services transaction using the tcode – /IWFND/MAINT_SERVICE. (..don’t forget to add /n in-front of the tcode)

3. Active the below OData services

/UI2/EASY_ACCESS_MENU Easy Access Menu service
/UI2/USER_MENU User Menu service

If you are not not familiar with OData activation process, click here to know the process.

4. Launch SAP Fiori Launchpad Designer. You can launch the Fiori Launchpad Designer in 2 ways

  1. Using the tcodes – /UI2/FLPD_CONF(cross-client) or /UI2/FLPD_CUST(client-specifc)
  2. Using any of these urls
  • http://[server]:[port]/sap/bc/ui5_ui5/sap/arsrvc_upb_admn/main.html?sap-client=900&sap-language=EN&scope=CUST
  • http://[server]:[port]/sap/bc/ui5_ui5/sap/arsrvc_upb_admn/main.html?sap-client=900&sap-language=EN&scope=CONF

change server, port and sap-client parameters as per your system details

5. Create a new Catalog by clicking on Add button

6. On Create Catalog dialog box provide values for Title and ID, hit Save to create the catalog.7. Navigate to Target Mapping tab and hit Create Target Mapping to create a new target mapping.8. On Configure Target Mapping provide these values for the respective fields.

Intent

Semantic Object Shell
Action startGUI

Target

Application Type Transaction(choose from the drop-down)
Title SAP Easy Access(any name of your choice)
Transaction SAPEasyAccess(any name of your choice)
System Alias leave it blank

General

Device Type Desktop

Parameters

Name Mandatory Value Is Regular Expression
sap-system Ticked S4HCLNT900 Not Ticked
sap-ui2-tcode Ticked .* Ticked

9. Hit Save button to save the configuration.

10. Create a new PFCG role and assign the Catalog.

11. Assign the PFCG role to the end users.

12. Finally launch Fiori Launchpad and navigate to App Finder, now three new buttons added to the header like below

13. Select User Menu or SAP Menu, all transactions available in the backend system added to you will be available like below

14. Click on “+” symbol to add any of these transactions to the group.

15. Navigate back to the Fiori Launchpad and the newly added tcode should be available as a tile under the selected group.

Benefits

Conclusion

Congrats.! ? you have successfully enable SAP Easy Access Menu for Fiori Launchpad in S4HANA.

The post S4HANA – How to enable SAP Easy Access Menu for Fiori Launchpad appeared first on SAP Fiori,SAP HANA,SAPUI5,SAP Netweaver Gateway Tutorials,Interview Questions|SAP Learners.

How to upgrade SAP Web IDE Personal Edition

$
0
0

Hello everyone, in the tutorial i would like to share the steps on how to upgrade SAP Web IDE Personal Edition in windows system.

if you have not installed Web IDE Personal Edition check out this guide for step-by-step installation.

if you have already installed and looking for upgrade steps proceed further

The Web IDE personal edition is updated quarterly and may not include features of SAP Web IDE on SAP Cloud Platform.

Step-by-Step Guide

1. Navigate to previously SAP Web IDE Personal Edition installed folder. In my case i have installed in C drive with the path C:\SAPWebIDE\sap-webide-personal-edition-1.45.3-trial-win32.win32.x86_64 (1)\eclipse like below.

If you have followed our SAP Web IDE Personal Edition installation guide, then it is the same path like mine

2. Copy and backup the following files and folder

  • orion.ini (file): This file holds proxy information.
  • orion.conf (file): This file is used when the Orion configuration is changed.
  • destinations (folder): This folder contains the destination you have set up.
  • serverworkspace (folder): This is the folder where all the users and their workspaces are stored.

orion.ini (file) and serverworkspace (folder) are available under this path
C:\SAPWebIDE\sap-webide-personal-edition-1.45.3-trial-win32.win32.x86_64 (1)\eclipse

destinations (folder) is available under this path
C:\SAPWebIDE\sap-webide-personal-edition-1.45.3-trial-win32.win32.x86_64 (1)\eclipse\config_master\service.destinations

orion.conf (file) if you have not done any Orion application server earlier, ignore this file.

3. Delete the SAP Web IDE personal edition folders and files from this path C:/SAPWebIDE4. Download and extract Web IDE personal edition from here. As the file size is bigger you will not able to unzip with WinZip software. You should use 7-zip to unzip the downloaded Web IDE personal edition

5. Copy the above extracted folder into main folder of the previous version i.e C:\SAPWebIDE

6. Restore the files which we took back up in the step-2 into respective files/folder in new version files/folder.


The post How to upgrade SAP Web IDE Personal Edition appeared first on SAP Fiori,SAP HANA,SAPUI5,SAP Netweaver Gateway Tutorials,Interview Questions|SAP Learners.

How to add Google Fonts in SAPUI5

$
0
0

Hello everyone, in this blog i would like to show you the steps on how to add Google fonts in SAPUI5 applications.

Background

SAP Fiori and SAPUI5 applications implements “Arial,Helvetica,sans-serif” font-family stack.These are widely used and most common typefaces.

In Fiori 2.0, SAP has created a new and modern typeface/font-family called “72” named after 1972, the year when SAP was founded. Click here to know more about this modern typeface.

It is good to use these typefaces when Fiori and SAPUI5 applications are used internally, but for customer facing applications to reflect their corporate branding clients end-up in using different typefaces.

This was the same case with my last client engagement, we have to use a different typeface in one of the SAPUI5 apps. So i would like to share the steps here on how we completed this task.

Step-by-Step Procedure

Google fonts – “Roboto” typeface is used in this example to show you the procedure

1. Navigate the Google fonts website and choose the font-family you want to use, in my case it is “Roboto” font-family.

2. Grab the code snippet provided under @IMPORT tab in google fonts.

3 Navigate to your SAPUI5 application and paste the code in css file and create a new style class with this new font-family like below.

/* Code snippet to load the font file*/
@import url('https://fonts.googleapis.com/css?family=Roboto');

/* style class used in views */
.textFont {
  font-family : "Roboto";
}

4. Navigate to the view and add the css class to the UI element like below

<mvc:View controllerName="UI_Define.controller.View1" 
      xmlns:html="http://www.w3.org/1999/xhtml" 
      xmlns:mvc="sap.ui.core.mvc" 
      xmlns="sap.m">
  <App>
    <pages>
      <Page title="GOOGLE Fonts in SAPUI5">
        <content>
          <Text text="Hello Google Fonts..!" class="textFont"></Text>
        </content>
      </Page>
    </pages>
  </App>
</mvc:View>

5. Save and test the application and you can see the font is applied to the view.

Congrats..! You have successfully added google fonts into SAPUI5 applications. Please stay tuned for more SAPUI5 blogs. Let us know your feedback.

The post How to add Google Fonts in SAPUI5 appeared first on SAP Fiori,SAP HANA,SAPUI5,SAP Netweaver Gateway Tutorials,Interview Questions|SAP Learners.

How to get SAP Cloud Foundry Trial Account

$
0
0

Hello SAPLearners, in this blog we will walk you through steps on how to get SAP Cloud Foundry trail account in SCP – SAP Cloud Platform.

Watch this introductory video on Cloud Foundry

Cloud Foundry is an open source, multi cloud application platform as a service (PaaS) governed by the Cloud Foundry Foundation  – by Wikipedia

Cloud Foundry in SAP Cloud Platform(SCP)

SAP Cloud Platform is proven development environment to develop and running business applications in cloud environment. Now SCP included Cloud Foundry an other development runtime along with Neo Environment

Cloud Found Environment – an open source application platform to develop entirely new enterprise application, enhance SAP products and integrate business applications. 

Neo Environment – a development environment that lets you develop HTML5-based, SAP HANA XS and complex Java applications.

Now you know of Cloud Foundry, lets try to get a trail account and have better understanding of it. Follow these steps to get SAP Cloud Foundry trial account.

Step-by-Step Procedure

Logon to SAP Cloud Platform trial account, if don’t have one register and get here.

After successful log-in, you will see the SCP cockpit like below, on this screen click Home

You will be navigated to Home page like below, choose Cloud Foundry Trail button.

On Start Cloud Foundry Trail popup window, choose the region in which you want to create the trial instance. You have four regions to choose, i am going with Europe (Frankfurt) region provided by AWS. Hit OK to create your trial account.

It will take couple of minutes to generate your trail account and can see the account processing

After successful creation of Cloud Foundry trial account, hit Go to Space

Cloud Foundry trail account is created and you can start develop and deploy applications

Congrats..! You have successfully created Cloud Foundry trail account. Stay tuned for next blog on connecting cloud foundry CLI and deploying the applications to cloud foundry.

The post How to get SAP Cloud Foundry Trial Account appeared first on SAP Fiori,SAP HANA,SAPUI5,SAP Netweaver Gateway Tutorials,Interview Questions|SAP Learners.

How to configure Link Area in SAP Fiori Launchpad

$
0
0

Dear SAPLearners, in this blog we will learn how to configure apps as short links in SAP Fiori Launchpad.

SAP Fiori Launchpad

SAP Fiori Launchpad is single point of access to all fiori apps on mobile and desktop devices. All apps visible on SAP Fiori launchpad appears as tiles and divided into different groups. Apps visibility can be controlled by the launchpad administrator based on the user roles.

Types of App Launcher Tiles

There are 3 main different types of app launcher tiles available for fiori launchpad content configuration, click here to know more

  • Static App Launcher Tiles
  • Dynamic App Launcher Tiles
  • News Tile

Each app launcher tile have some definite size and occupies space on SAP Fiori Launchpad home page. Lets look at the below image,

all these tiles simply show the description and an icon. But these tiles are mostly filled with white spaces and don’t have useful information.More tiles of this kind may lead to many empty boxes on SAP Fiori Launchpad home page and not an option for most of the customers.

To save us from this empty white boxes, SAP provided a new area in SAP Fiori Launchpad called Link Area.

Link Area

Link Area is collection of links which are used to launch fiori apps just like the tiles. In contrast to tile display, links occupy less space and allows to display more apps. Link Area is available below the tiles in each groups.

In this blog we will learn how to configure this Link Area in SAP Fiori Launchpad.

Prerequisites

  • SAP Fiori Launchpad Designer(FLPD) administrator access.
  • Quick read on configuring tiles in SAP Fiori Launchpad

Step-by-Step Procedure

Before moving further i would assume you know how to create catalogs and groups in SAP Fiori Launchpad.

1. Navigate to SAP Fiori Launchpad Designer(FLPD) by accessing the url “http://<server>:<port>/sap/bc/ui5_ui5/sap/arsrvc_upb_admn/main.html?scope=CUST” replace server and port. These transaction codes /UI2/FLPD_CUST or /UI2/FLPD_CONF can also be used

2. While creating groups in the SAP Fiori launchpad designer, you will see 2 sections like below

Show as Tiles – when click on add and provide the configurations, this will creates a tile in SAP Fiori Launchpad which is an usual way and i hope every one is aware of it

Show as Links – Yes, this will create Link Area and when you click on add and provide the configurations this will appear as links

3. Click on Add Tile option which is under Show as Links section

4. On Add Tile to the selected group screen, choose the catalog from which you want to include the tiles and select the tiles by clicking on “+” sign.

5. Navigate back to the previous screen, all selected tiles will be displayed under the Show as Links section

We are done with launchpad configurations. Navigate to SAP Fiori Launchpad home page to see those short links.

Congrats.! You have successfully learned the Link Area in SAP Fiori Launchpad and how it can be configured. Stay tuned for more SAP Fiori tutorials.

Please feel free to comment and let us know your feedback.

The post How to configure Link Area in SAP Fiori Launchpad appeared first on SAP Fiori,SAP HANA,SAPUI5,SAP Netweaver Gateway Tutorials,Interview Questions|SAP Learners.

How to check the current SAPUI5 library version

$
0
0

Dear SAPLearners, in this short blog we will learn how to check current SAPUI5 library version on ABAP system.

SAPUI5 Library Version

There are different ways to check the current SAPUI5 library version on ABAP system, this blog will show three ways.

SAP Fiori Launchpad

On Fiori Launchpad use the key board shortcut Ctrl+Shift+Alt+P to view the library version

Direct URL

Copy this url in browser http://<host>:<port>/sap/public/bc/ui5_ui5/index.html replace host and port

ABAP Workbench

Go to transaction SE80 – ABAP Workbench

Choose MIME Repository, if you don’t see the option enable it by following the below screen instructions

Navigate to SAP→PUBLIC→BC→UI5→LIBRARIES→VER

Congrats..! Now you know how to check the SAPUI5 library version on ABAP system. Please stay for more SAPUI5 tutorials.

Please feel free to comment and let us know your feedback.

The post How to check the current SAPUI5 library version appeared first on SAP Fiori,SAP HANA,SAPUI5,SAP Netweaver Gateway Tutorials,Interview Questions|SAP Learners.

How to create domains using eclipse-based ABAP editor | ABAPInEclipse

$
0
0

Hello everyone, in this ABAP in Eclipse(AIE) blog post you will learn how to create, update DDIC Domains through Eclipse ADT tools.

Working with Domains

We all know about ABAP Data dictionary domain and also know how to create them using SE11- Data Dictionary transaction code.Since ABAP 7.5, a form-based editor is available in ABAP Development Tools(ADT) to create,edit and delete domains.

Lets create a domain using the form-based editor in our eclipse-based IDE for ABAP development.

Step-by-step Procedure

1. Launch eclipse-based IDE and a create an ABAP Repository Object under an ABAP project.

Also Read : How to create an ABAP Project in eclipse-based abap editor

2. On New ABAP Repository Object window search for “Dictionary” or “Domain“. Choose Domain under Dictionary folder and hit Next.3. On New Domain window provide Package in which domain is saved, Name and Description of the domain. Click Finish.

4. The form-based editor will be displayed like below. Provide values for mandatory fields Data Type and LengthThe form-based editor have different sections for the following information

  1. Format – technical attributes like data type and length.
  2. Output Characteristics – output semantic attributes like output length, conversion routine and case-sensitive.
  3. Fixed Values – for defining, editing ,sorting and deleting fixed values or intervals
  4. Value Table – define value table

5. Save and Activate the domain.

Standard Domain

Congrats.! you have successfully created a domain in eclipse-based ABAP editor.Stay tuned for more ABAP in Eclipse tutorials.

Please feel free to comment and let us know your feedback.

The post How to create domains using eclipse-based ABAP editor | ABAPInEclipse appeared first on SAP Fiori,SAP HANA,SAPUI5,SAP OData Tutorials,ABAP Interview Questions|SAP Learners.


What is LET keyword in ABAP 7.4

$
0
0

Dear saplearners, in this blog post we will learn about LET keyword in ABAP 7.4

‘LET’ Keyword

LET is a new syntax keyword introduced in ABAP 7.4. This keyword is used for local declarations in constructor expressions.

In our previous blog posts we learned about inline declarations to declare the variables with out explicit data type declaration in a program, start of sub-routine, method etc.

Inline declarations will reduce the number of lines in programs.

In the same way the LET keyword is also used to declare variables with short lifespans by getting us relieved from declaring helper variables.

Lets see how this can make an ABAPer happier 🙂

Where can i use LET?

LET expressions can be used in the following constructor expressions

  1. NEW
    • Single Values
    • Structures
    • Internal Tables
    • Classes
  2. VALUE
    • Structures
    • Internal Tables
  3. CONV
  4. CAST
  5. EXACT
  6. REDUCE
  7. COND
  8. SWITCH

Apart from the above constructor expressions the LET expressions can be used in all iteration expressions with FOR.

Example #1

LET statement usage in constructor expression CONV


In the above example line-29 we have used LET statement to declare local variables airline_name, airline_from, airline_to and used them to built the final output string.

Output


With out LET statement, we would have declared the helper variables before the LOOP statement and use them. Thanks to LET statement in avoiding those unwanted declaration of helper variables.

As the local variables declared using LET statement have short lifespan, after the statement is over those variables does not exists any longer.

Example #2

LET statement usage in constructor expression VALUE


Also Read: Inline declarations in ABAP 7.4

Congrats..! You have successfully learned about LET keyword in ABAP 7.4. So start using the new syntax and write some good code.

Please feel free to comment and let us know your feedback. Subscribe for updates

The post What is LET keyword in ABAP 7.4 appeared first on SAP Fiori,SAP HANA,SAPUI5,SAP OData Tutorials,ABAP Interview Questions|SAP Learners.

Constructor Expressions in ABAP 7.4 [Part I]

$
0
0

Dear saplearners, in this blog post we are going to learn about ABAP 7.4 new syntax and more about constructor expressions and constructor operators

Constructor Expressions

A new type of expression called constructor expressions are introduced to construct results of specified types and their contents.

Lets quickly glimpse through SAP’s definition for constructor expression


A constructor expression comprises of

  • a predefined constructor operator,
  • a data type or object type that matches the operator and that can be derived implicitly from the operand position using #,
  • and type-specified parameters specified in parentheses.

Before we delve in how to build the constructor expressions, first we need to know about the constructor operators.

Constructor Operators

Below are the list of constructor operators which we can use to build constructor expression in ABAP 7.4

  • NEW
  • VALUE
  • REF
  • CORRESPONDING
  • CONV
  • EXACT
  • CAST
  • REDUCE
  • FILTER
  • COND
  • SWITCH

Each of these constructor operator have its own purpose which we will learn in-detail with some example ABAP code snippets.

As the list of operators are more to cover in one blog post, we are going to learn to use these constructor operators to build constructor expression in 2 blog posts.

In this first part of Constructor Expressions in ABAP7.4, lets see these constructor operators

1. NEW

NEW is an instance operator that you can use to create instance of a class or data-object. Lets see some constructor expressions that we can build using this operator.

Example#1 – Class

In the above example, we used instance operator NEW to create an instance for a class. ABAP code lines 10 & 11 are old way syntax and we all know about it, but look at the ABAP code at line-15 is the new syntax in ABAP 7.4

We can also use NEW instance operator for instantiating or initial values for Structures, Internal Tables, Types and Data Types but i prefer using the VALUE operator and lets see we can do this

2. VALUE

A constructor expression with the value operator VALUE creates a result of a data type specified using type.The operator can be used to create initial values for all Types, Structures and Internal Tables. Lets see the usage of the operator with some code snippets

Example#1 – Initializing the Structures

Before 7.4 we have to use the below syntax to initialize the structure values. As the complexity of structure with grows with more fields and nested structures it will be very difficult

With ABAP 7.4 new syntax the initializing can be made easy with new syntax like below

In the above abap code snippet there are two options to initialize the structure first one DATA(…) = VALUE type(…) is explicit and later VALUE #(…) is implicit one. Both can serves the same purpose and can use any one of them

Example#2 – Initializing the Internal Tables

Before 7.4, we have to use APPEND statement to initialize the internal tables

With ABAP 7.4 new syntax the initializing can be made easy with new syntax like below

we can achieve the same results using inline structure initialization like below and a short-form as well.


Congrats..! you learned about ABAP 7.4 new syntax, try this out in your next ABAP program and let me know how you feel about it.

Please feel free to comment and let us know your feedback. Subscribe for updates

If you liked it, please share it! Thanks!

The post Constructor Expressions in ABAP 7.4 [Part I] appeared first on SAP Fiori,SAP HANA,SAPUI5,SAP OData Tutorials,ABAP Interview Questions|SAP Learners.

MOVE-CORRESPONDING for Internal Tables in ABAP 7.4

$
0
0

Dear saplearners, yes you heard me correct MOVE-CORRESPONDING works for internal tables with ABAP 7.4 and in this blog post you will learn more about.

MOVE-CORRESPONDING

We all know about this keyword and we have been since we learned it. For the benefit of me i would like to define it once again.

MOVE-CORRESPONDING is used to move values from one structure to another.

Now that you can not wait to know how this works for internal tables. I have to keep you waiting a little longer and introduce you to a new ABAP 7.4 keyword, a constructor operator called CORRESPONDING

CORRESPONDING in ABAP 7.4

This constructor operator can be used to move data between two internal tables with a different set of columns. Lets see this with an example.

Before that lets say if we were have to do this in previous ABAP versions(<7.4) we all know how painful it is to LOOP the first internal table, move the fields with some extra helper variables and finally APPEND to another internal table.

TYPES : BEGIN OF lty_demo1,
          col1 TYPE c,
          col2 TYPE c,
        END OF lty_demo1,

        BEGIN OF lty_demo2,
          col1 TYPE c,
          col3 TYPE c,
          col4 TYPE c,
        END OF lty_demo2.

DATA: itab1 TYPE STANDARD TABLE OF lty_demo1,
      itab2 TYPE STANDARD TABLE OF lty_demo2.

itab1 = VALUE #( ( col1 = 'A' col2 = 'B' )
                 ( col1 = 'P' col2 = 'Q' )
                 ( col1 = 'N' col2 = 'P' )
               ).

LOOP AT itab1 INTO ls_tab1.
  MOVE-CORRESPONDING ls_tab1 TO ls_tab2.
  ls_tab2-col3 = ls_tab1-col2.
  APPEND ls_tab2 TO itab2.

  CLEAR: ls_tab1,ls_tab2.
ENDLOOP.

But you are lucky, SAP got your back and understood your pain. So with ABAP 7.4 version  CORRESPONDING keyword easily moves data between internal tables.

Example #1

Lets start to learn more about with a simple example like below.

TYPES : BEGIN OF lty_demo1,
          col1 TYPE c,
          col2 TYPE c,
        END OF lty_demo1,

        BEGIN OF lty_demo2,
          col1 TYPE c,
          col3 TYPE c,
          col4 TYPE c,
        END OF lty_demo2.

DATA: itab1 TYPE STANDARD TABLE OF lty_demo1,
      itab2 TYPE STANDARD TABLE OF lty_demo2.

itab1 = VALUE #( ( col1 = 'A' col2 = 'B' )
                 ( col1 = 'P' col2 = 'Q' )
                 ( col1 = 'N' col2 = 'P' )
               ).
itab2 = CORRESPONDING #( itab1 ).

cl_demo_output=>write_data( itab1 ).
cl_demo_output=>write_data( itab2 ).
cl_demo_output=>display( ).

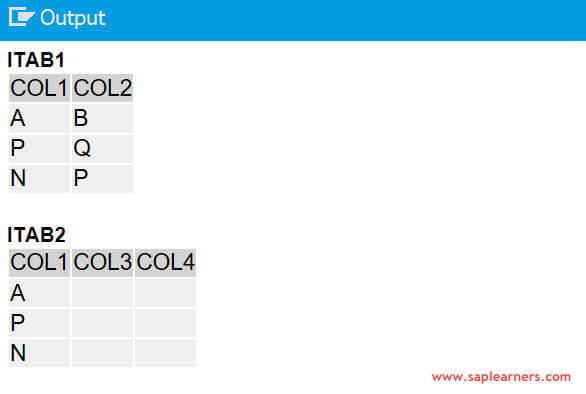
yes, that is it one line of ABAP code and the data is moved from one internal table to another internal table comparing the column names, if the column names does not match those values will be initialized – check the output below

Example #2

Lets make this example more complex, i have a column named COL2 in both internal internal tables but while copying i don’t want the value of this COL2 to be copied to another internal table.

TYPES : BEGIN OF lty_demo1,
          col1 TYPE c,
          col2 TYPE c,
        END OF lty_demo1,

        BEGIN OF lty_demo2,
          col1 TYPE c,
          col2 TYPE c,
          col3 TYPE c,
        END OF lty_demo2.

DATA: itab1 TYPE STANDARD TABLE OF lty_demo1,
      itab2 TYPE STANDARD TABLE OF lty_demo2.

itab1 = VALUE #( ( col1 = 'A' col2 = 'B' )
                 ( col1 = 'P' col2 = 'Q' )
                 ( col1 = 'N' col2 = 'P' )
               ).
itab2 = CORRESPONDING #( itab1 EXCEPT COL2 ).

cl_demo_output=>write_data( itab1 ).
cl_demo_output=>write_data( itab2 ).
cl_demo_output=>display( ).

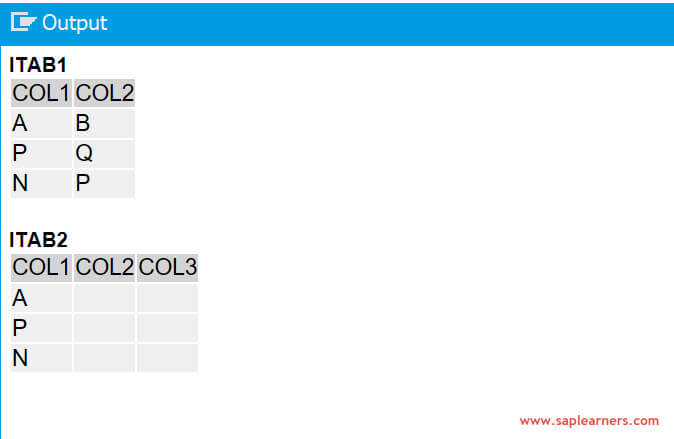
and this more easy than you think with adding a keyword EXCEPT with the column name as an exception – check the output below COL2 data was not copied even though the same column exists in both internal tables.

Example #3

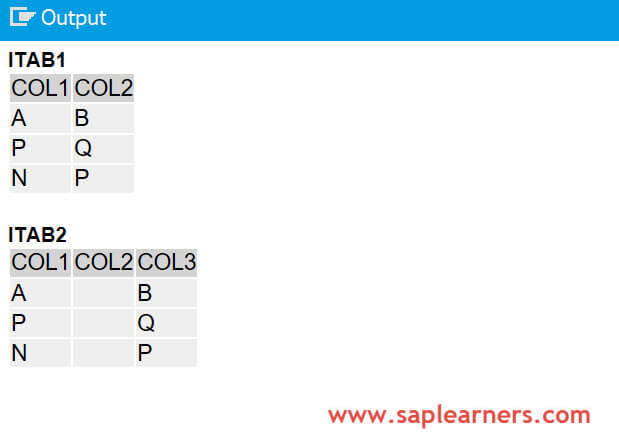
Lets make this example even more complex, i have two different set of columns for the two internal tables and copy the column named COL2 of first internal table to COL3 of second internal table and the code is

TYPES : BEGIN OF lty_demo1,
          col1 TYPE c,
          col2 TYPE c,
        END OF lty_demo1,

        BEGIN OF lty_demo2,
          col1 TYPE c,
          col2 TYPE c,
          col3 TYPE c,
        END OF lty_demo2.

DATA: itab1 TYPE STANDARD TABLE OF lty_demo1,
      itab2 TYPE STANDARD TABLE OF lty_demo2.

itab1 = VALUE #( ( col1 = 'A' col2 = 'B' )
                 ( col1 = 'P' col2 = 'Q' )
                 ( col1 = 'N' col2 = 'P' )
               ).
itab2 = CORRESPONDING #( itab1 MAPPING COL3 = COL2 EXCEPT COL2 ).

cl_demo_output=>write_data( itab1 ).
cl_demo_output=>write_data( itab2 ).
cl_demo_output=>display( ).

yes just a lot more simple code by adding a MAPPING keyword for the two different columns of two different internal tables – check the output belowCongrats.. ! you have learned how CORRESPONDING works for internal table in ABAP 7.4 version. Stay tuned for more ABAP 7.4 tutorials.

Also Read: What are inline declarations in ABAP 7.4

Please feel free to comment and let us know your feedback. Subscribe for more updates.

If you liked it, please share it! Thanks!

The post MOVE-CORRESPONDING for Internal Tables in ABAP 7.4 appeared first on SAP Fiori,SAP HANA,SAPUI5,SAP OData Tutorials,ABAP Interview Questions|SAP Learners.
FILTER operator for Internal Tables in ABAP 7.4

$
0
0

Dear saplearners, in this blog we all are going to learn about abap internal table filtering using FILTER operator in ABAP 7.4

FILTER Operator

A new FILTER operator is available which can used on ABAP internal tables to filter the data (or) to retrieve subset of data into a new internal table. As of ABAP 7.4 this keyword is available to use in the system.

The result of FILTER operator is a new internal table with filtered data.

First of all, lets see how we can perform the internal table filtering in the system before ABAP 7.4 version. I am sure that we all end up in creating a LOOP with a WHERE condition and finally doing an APPEND to another internal table.

ABAP code snippet will look something like this

DATA: lt_flights_all TYPE STANDARD TABLE OF spfli,
      lt_flight_lh   TYPE STANDARD TABLE OF spfli.

SELECT *  FROM spfli
          INTO TABLE @lt_flights_all.
IF sy-subrc = 0.

  LOOP AT lt_flights_all INTO DATA(ls_flight) WHERE carrid = 'LH'.

    APPEND ls_flight TO lt_flight_lh.
    CLEAR: ls_flight.

  ENDLOOP.
ENDIF.

that’s hell of a coding lines written for just simple task and if the complexity of filtering logic increase we need to write more lines of ABAP code. We definitely need some change here, is it ?

So, as of ABAP 7.4 , the FILTER keyword came into our world to save us from those extra keyboard hits. Lets let get to know more about it with some examples.

FILTER with single values

Lets take the same above example and refine the internal table filtering logic with the new FILTER keyword.

DATA: lt_flights_all TYPE STANDARD TABLE OF spfli 
                     WITH NON-UNIQUE SORTED KEY carrid
                     COMPONENTS carrid,
 
      lt_flight_lh   TYPE STANDARD TABLE OF spfli.

SELECT *  FROM spfli
          INTO TABLE @lt_flights_all.
IF sy-subrc = 0.

lt_flight_lh = FILTER #( lt_flights_all USING KEY carrid 
                                        WHERE carrid = 'LH ' ).

ENDIF.

as a result, the internal table LT_FLIGHTS_ALL is filtered on WHERE condition and filtered data will be available in the internal table LT_FLIGHT_LH.

Yes, that is just a line of statement to filter the data using FILTER keyword. Cool it is..!

The above example is a basic syntax form using FILTER keyword, now look at the another syntax form with filter table

FILTER with filter table

To explain FILTER with filter table syntax form, we need two internal tables. One which contains the actual data on which filtering is applied and other is filter internal table which contains the filter values used for filtering.

In previous example we performed the filter with a single value, now add some more filter values. Sample code snippet will look like something below.

DATA: lt_flights_all TYPE STANDARD TABLE OF spfli
                     WITH NON-UNIQUE SORTED KEY carrid
                     COMPONENTS carrid,
      lt_flight_final TYPE STANDARD TABLE OF spfli.

SELECT *  FROM spfli
          INTO TABLE @lt_flights_all.

* Create a filter internal table with multiple values
DATA filter_tab  TYPE SORTED TABLE OF scarr-carrid
                 WITH UNIQUE KEY table_line.
filter_tab = VALUE #( ( 'AA ' ) ( 'LH ' ) ).

* Apply filters
lt_flight_final = FILTER #( lt_flights_all IN filter_tab
                                           WHERE carrid = table_line ).

cl_demo_output=>write_data( lt_flights_all ).
cl_demo_output=>write_data( lt_flight_final ).
cl_demo_output=>display( ).

So by using the help filter table you can apply FILTERing on internal tables. Output look like below

Notes

Below are some points to keep in mind when using the FILTER operator

  • The internal table on which FILTER operator is used must have at least one sorted key or one hash key used for access.
  • The row type of main internal table and result internal table do not need to be identical
  • The Boolean operators NOT, OR, and EQUIV cannot be used in the WHERE condition.

Congrats..! you have learned about FILTER operator, try this in you next ABAP program and let me know feedback. Please feel free to comment and let us know your feedback. Subscribe for more updates.

If you liked it, please share it! Thanks!

The post FILTER operator for Internal Tables in ABAP 7.4 appeared first on SAP Fiori,SAP HANA,SAPUI5,SAP OData Tutorials,ABAP Interview Questions|SAP Learners.

Do you know about the CL_ABAP_CORRESPONDING system class

$
0
0

Dear SAPLearners, in this blog post you will learn about the CL_ABAP_CORRESPONDING system class and its usage.

CL_ABAP_CORRESPONDING

Does the name of the class rings bell of something you already know? Yes, I think you got the answer. CL_ABAP_CORRESPONDING allows to move data between structures or Internal tables through dynamic mappings.

In our earlier blogs we have seen other alternatives to this system class like MOVE-CORRESPONDING, CORRESPONDING but allows only when column names are identical and with static mapping rules.

Also Read: MOVE-CORRESPONDING for internal tables.

There are two main methods in this class CREATE and EXECUTE which allows component assignment between structures or internal tables based on dynamic mapping rules.

CREATE( )

This method is to create the mapping object. Mapping object mainly contains mapping rules, source and destination. The source and destination structures (or) internal tables need not to be of identical column names

EXECUTE( )

This method is to run the data transfer based on the mapping object created using CREATE method.

Lets dive in and learn more about the class CL_ABAP_CORRESPONDING with examples from basic to complex.

Example#1 – Simple Assignment between Structures

Below example will move the data between two simple structures which are of different column names

TYPES:
  BEGIN OF struct1,
    a1 TYPE string,
    a2 TYPE string,
    a3 TYPE string,
  END OF struct1,

  BEGIN OF struct2,
    b1 TYPE string,
    b2 TYPE string,
    b3 TYPE string,
  END OF struct2.

DATA dest_struct TYPE struct2.

DATA(src_struct) = VALUE struct1( a1 = 'Jon Snow'
                                  a2 = 'Arya Stark'
                                  a3 = 'Daenerys').
* Create a Mapping Object
DATA(lo_mapping_object) =
         cl_abap_corresponding=>create(
           source      = src_struct
           destination = dest_struct
           mapping     = VALUE cl_abap_corresponding=>mapping_table(
             ( level = 0 kind = 1 srcname = 'A1' dstname = 'B1' )
             ( level = 0 kind = 1 srcname = 'A2' dstname = 'B2' )
             ( level = 0 kind = 1 srcname = 'A3' dstname = 'B3' )
           ) ).

* Transfer the data from src_struct to dest_struct
lo_mapping_object->execute( EXPORTING source      = src_struct
                            CHANGING  destination = dest_struct ).

cl_demo_output=>display( dest_struct  ).

Example#2 – Simple Assignment between Internal Tables

Below example will move the data between two ABAP Internal tables which are of different column names

TYPES:
  BEGIN OF struct1,
    a1 TYPE string,
    a2 TYPE string,
    a3 TYPE string,
  END OF struct1,

  BEGIN OF struct2,
    b1 TYPE string,
    b2 TYPE string,
    b3 TYPE string,
  END OF struct2,

  tty_struct1 TYPE TABLE OF struct1 WITH EMPTY KEY.

DATA dest_itab TYPE STANDARD TABLE OF struct2.

DATA(src_itab) = VALUE tty_struct1( 
                 ( a1 = 'Jon Snow' a2 = 'Arya Stark'  a3 = 'Daenerys' )
                 ( a1 = 'Tyrion'   a2 = 'Sansa Stark' a3 = 'Cersei' ) ).

* Create a Mapping Object
DATA(lo_mapping_object) =
         cl_abap_corresponding=>create(
           source      = src_itab
           destination = dest_itab
           mapping     = VALUE cl_abap_corresponding=>mapping_table(
             ( level = 0 kind = 1 srcname = 'A1' dstname = 'B1' )
             ( level = 0 kind = 1 srcname = 'A2' dstname = 'B2' )
             ( level = 0 kind = 1 srcname = 'A3' dstname = 'B3' )
           ) ).

* Transfer the data from src_struct to dest_struct
lo_mapping_object->execute( EXPORTING source      = src_itab
                            CHANGING  destination = dest_itab ).

cl_demo_output=>display( dest_itab  ).

The output of the above code looks like below

So, we saw few basic use-cases of CL_ABAP_CORRESPONDING, before going any further with some complex examples we will give a pause and learn more about the mapping object.

In the above examples, you have seen the CREATE( ) method in CL_ABAP_CORRESPONDING class to create a mapping object/rules. The mapping table has the following parameters to be passed while creating the mapping object.

LEVEL

Level of the component in the structure or internal table. The possible values for this parameter are from 0 to n, where 0 is top-level.

When you want to move the data between nested structures/internal tables, this parameter is used to define the level of the component.

KIND

defines the Mapping Type. Possible values are

  • CL_ABAP_CORRESPONDING=>MAPPING_COMPONENT (or) 1 – The field name specified in srcname and dstname are mapped each other
  • CL_ABAP_CORRESPONDING=>MAPPING_EXCEPT_COMPONENT (or) 2 – The field name specified in srcname is ignored while mapping if identical field names exists.
  • CL_ABAP_CORRESPONDING=>MAPPING_EXCEPT_ALL (or) 3 – if source and destination structure/internal table have common field names, all these field names are ignored while mapping.
  • CL_ABAP_CORRESPONDING=>MAPPING_DISCARDING_DUPLICATES (or) 9 – duplicate rows in source internal table are ignored while mapping, the destination internal table will have unique rows.

SRCNAME

Specify the field name of source structure or internal table

DSTNAME

Specify the field name of destination structure or internal table

By passing different values for the above parameters you can create the desired mapping object with different mapping rules

Now that we know about CL_ABAP_CORRESPONDING system class and its use-cases, lets continue this in our next blog with complex use-cases.

Also Read: New Constructor operators in ABAP 7.4

Congrats!! you have successfully learned about the ABAP system class CL_ABAP_CORRESPONDING.

Please feel free to comment and let us know your feedback. Subscribe for more updates.

If you liked it, please share it! Thanks!

The post Do you know about the CL_ABAP_CORRESPONDING system class appeared first on SAP Fiori,SAP HANA,SAPUI5,SAP OData Tutorials,ABAP Interview Questions|SAP Learners.

Viewing all 211 articles
Browse latest View live


<script src="https://jsc.adskeeper.com/r/s/rssing.com.1596347.js" async> </script>